A step by step guide on how to conduct API stress tests using Apache JMeter's HTTP(S) Test Script Recorder and Postman's proxy configuration.

Starting by introducing some key points about performing testing, in this article, I’ll explain, step by step, how to conduct API stress tests using Apache JMeter’s HTTP(S) Test Script Recorder and Postman’s proxy configuration.
Performance testing is a critical aspect of software quality assurance that focuses on evaluating the speed, responsiveness, scalability, and overall performance of a software application or system under various conditions. It involves simulating real-world scenarios and user interactions to measure how well an application performs under different workloads.
Here are some key points about performance testing:
Purpose of Performing Testing
The primary purpose of performance testing is to ensure that a software application meets performance expectations and can handle the required load without degrading in quality or responsiveness.
Types of Performance Testing
1. Load Testing
This involves subjecting the application to expected loads and measuring its response time, resource utilization, and throughput.
2. Stress Testing
Stress testing evaluates how the application performs under extreme conditions, often pushing it beyond its capacity to identify bottlenecks and weaknesses.
3. Scalability Testing
Scalability testing assesses the system’s ability to handle increasing loads by adding resources or scaling horizontally.
4. Volume Testing
This tests the application’s ability to manage large amounts of data without performance degradation.
5. Endurance Testing
Also known as soak testing, this evaluates how well the application performs over an extended period, checking for memory leaks and resource utilization issues.
6. Key Metrics
Performance testing measures various metrics, including response time, throughput, CPU and memory usage, network latency, and error rates.
7. Tools
Performance testing is often conducted using specialized tools such as Apache JMeter, LoadRunner, Gatling, and more, which help create realistic testing scenarios and collect performance data.
8. Realistic Scenarios
Test scenarios are designed to mimic real-world usage patterns, considering factors like the number of concurrent users, data volume, and transaction rates.
9. Continuous Integration
Performance testing can be integrated into the continuous integration and continuous delivery (CI/CD) pipeline to identify performance regressions early in the development process.
Benefits
Performance testing helps organizations:
- Identify and resolve performance bottlenecks.
- Ensure that applications meet service-level agreements (SLAs).
- Prevent outages and downtime due to performance issues.
- Enhance user satisfaction by delivering a responsive application.
- Optimize resource utilization and reduce infrastructure costs.
- Mitigate risks associated with poor performance.
Scalability Planning
Performance testing results inform scalability planning, helping organizations make informed decisions about infrastructure scaling, load balancing, and capacity planning.
User Experience
A well-performing application contributes to a positive user experience, fostering user retention, and satisfaction.
Continuous Improvement
Performance testing is an iterative process that encourages ongoing improvements in an application’s performance, ensuring it can adapt to changing demands and technology advancements.
Performance testing is a crucial component of software testing that ensures applications meet performance expectations, deliver a seamless user experience, and perform reliably under various conditions. It plays a significant role in optimizing performance, minimizing risks, and contributing to the overall success of software projects. In the world of modern software development, ensuring the robustness and scalability of your web APIs is paramount. API stress testing allows you to evaluate how your APIs perform under heavy loads, helping you identify and address potential bottlenecks, and vulnerabilities. In this comprehensive guide, we will walk you through the process of conducting API stress tests using Apache JMeter’s HTTP(S) Test Script Recorder in conjunction with Postman’s proxy configuration. This powerful combination allows you to capture and analyze critical performance data to ensure the reliability of your APIs.
Prerequisites
Before we begin, make sure you have the following tools and components installed:
- Apache JMeter: Download and install JMeter from the official website (https://jmeter.apache.org/).
- Java Development Kit (JDK): JMeter requires Java, so ensure you have the latest JDK installed on your system.
- Postman: Install Postman from the official website (https://www.postman.com/downloads/).
Step 1: Set Up JMeter
Start by downloading and installing Apache JMeter on your local machine. Once installed, launch JMeter by executing the jmeter.bat (Windows) or jmeter.sh (Linux) script.
Step 2: Configure JMeter’s HTTP(S) Test Script Recorder
- In JMeter, navigate to “File” and select “Templates.” From the available templates, choose “Recording.”
- Click the “Create” button to create a Test Plan based on the recording template. This template configures JMeter for capturing HTTP requests.
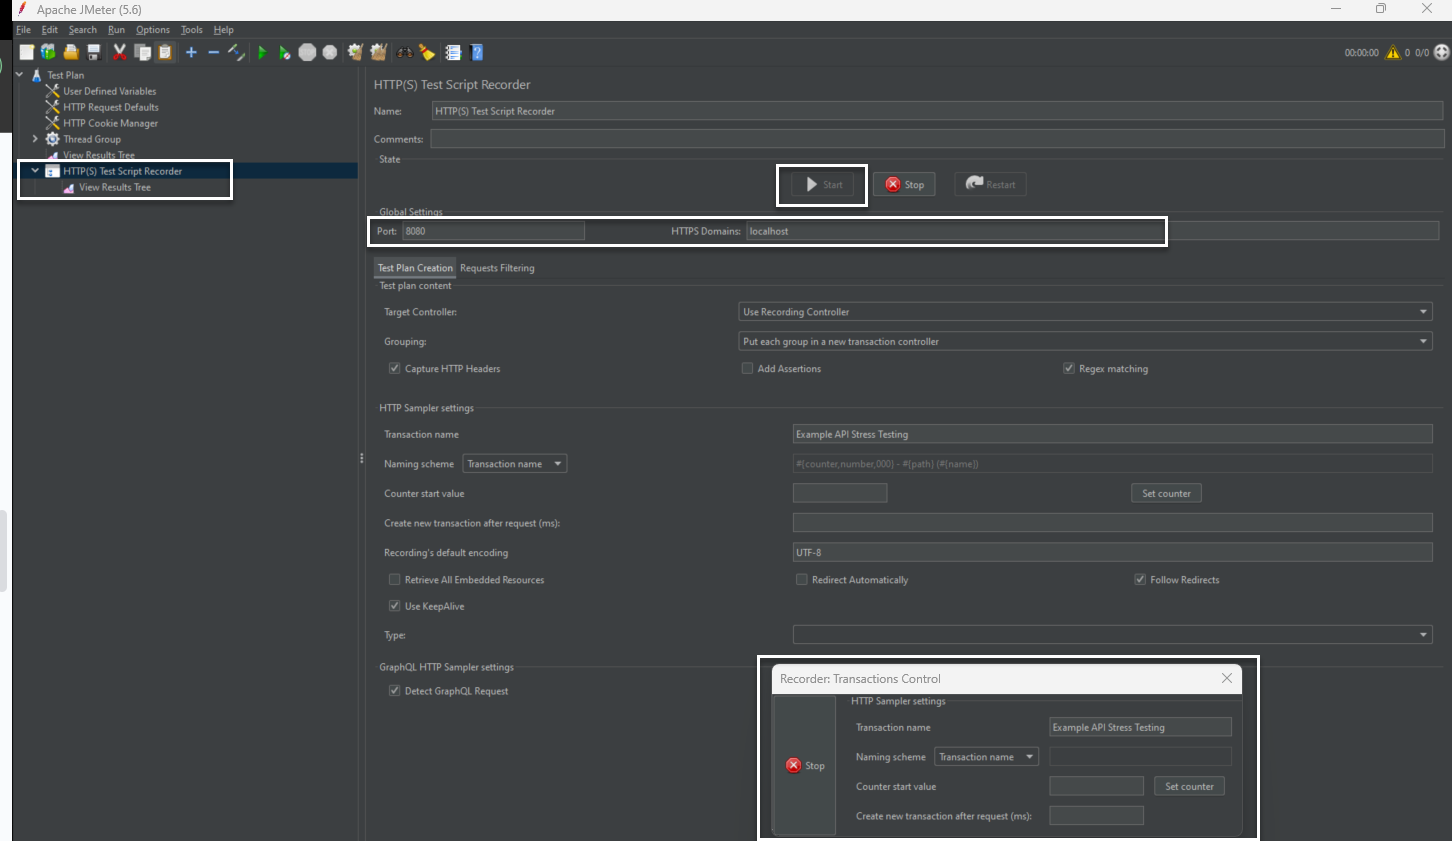
- In the “WorkBench” section of your Test Plan, you will find an element called “HTTP(S) Test Script Recorder.” Right-click on it and select “Enable.” This controller will hold the recorded requests.
- Configure the HTTP(S) Test Script Recorder by selecting it and clicking the “Start” button. Specify the port (e.g., 8080) that JMeter should listen on for incoming requests.
Step 3: Configure Postman for Proxy
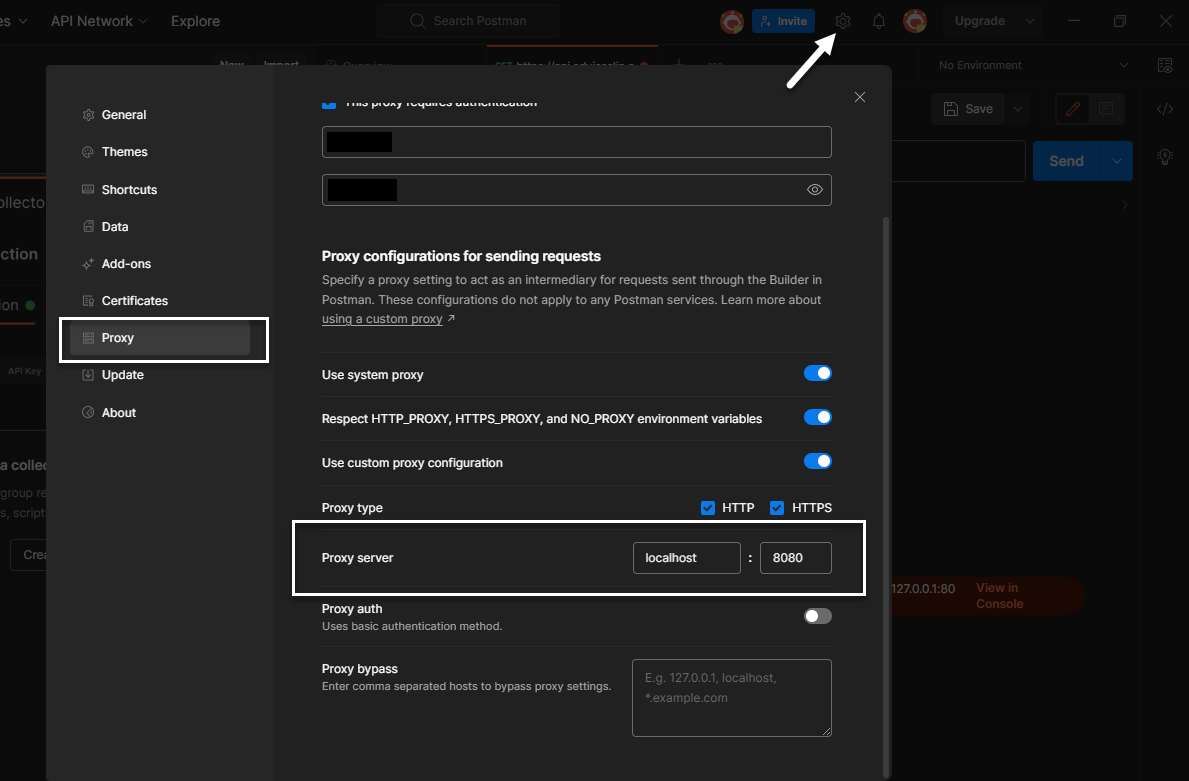
- Open Postman and go to “Settings.”
- In the “Proxy” section, set the proxy host to “localhost” and the port to the same port you specified in JMeter’s HTTP(S) Test Script Recorder (e.g., 8080).
Step 4: Capture API Requests with Postman and JMeter
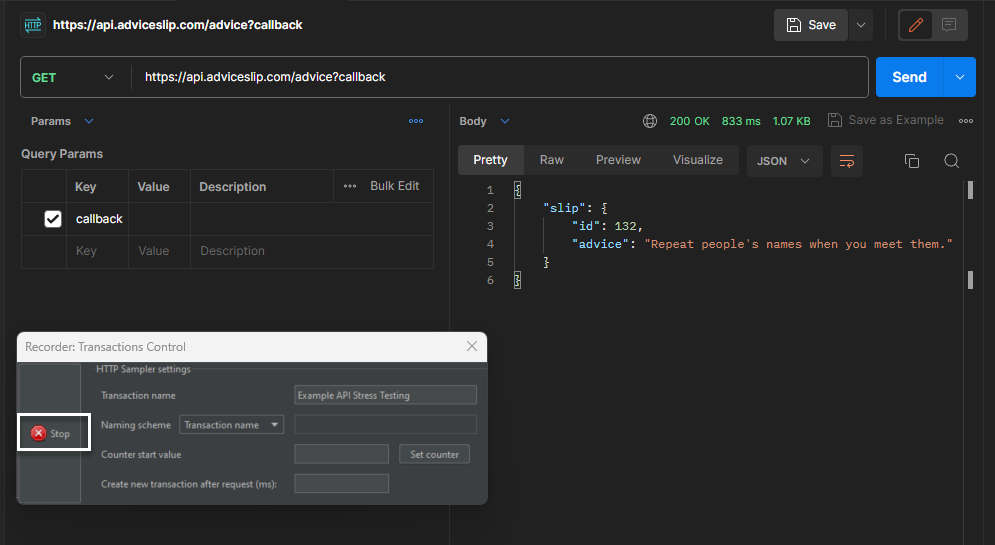
- With the proxy configuration in place, Postman requests will now be routed through JMeter’s HTTP(S) Test Script Recorder.
- Execute the API requests you want to test in Postman. JMeter will capture these requests.
- Ensure you cover the scenarios you want to test, including different endpoints, methods, and parameters.
Step 5: Stop JMeter Recording
Once you’ve completed your API requests in Postman, return to JMeter’s HTTP(S) Test Script Recorder and click the “Stop” button to end the recording session.
Step 6: Review and Save Recorded Requests
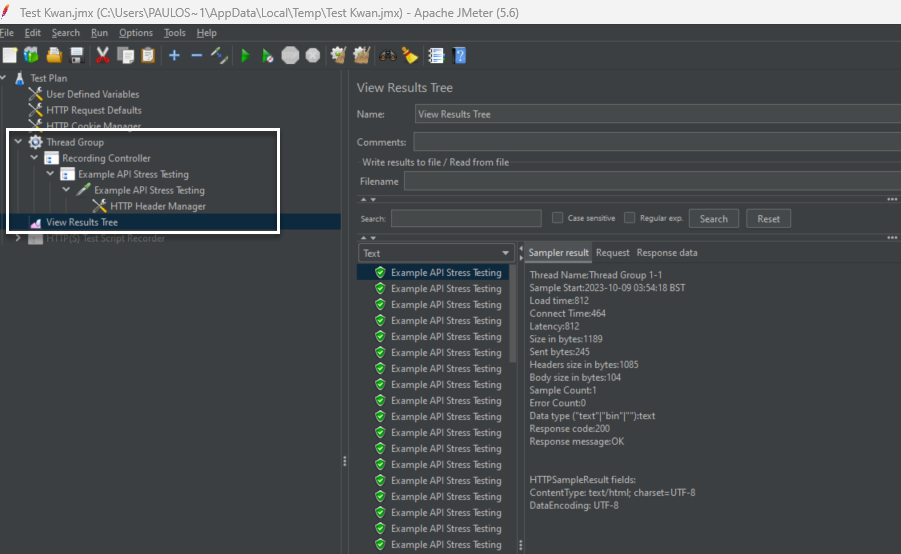
- In JMeter’s “Recording Controller,” you will find a list of recorded HTTP requests.
- Review and modify these requests as needed, ensuring they are correctly configured for your stress test.
- Save the recorded requests as a JMX (Java Mission Control) file by selecting “File > Save Test Plan As” in JMeter.
Step 7: Configure JMeter for Stress Testing
- Open the saved JMX file in JMeter to access your recorded requests.
- Customize your Test Plan by adding Thread Groups, adjusting thread counts, and setting up any additional elements like HTTP Request Defaults or Authorization Managers.
Step 8: Run the Stress Test
- Save your JMeter Test Plan.
- Start the stress test by clicking the “Run” button (green triangle) in JMeter.
- JMeter will simulate the defined number of users and execute the API requests captured during the recording process.
Step 9: Analyze Results
- After the stress test concludes, JMeter will provide detailed performance metrics and reports.
- Analyze the results to identify bottlenecks, assess response times, discover errors, and gain insights into your API’s performance.
Mastering API Stress Testing with JMeter’s HTTP(S) Test Script Recorder and Postman Proxy Configuration: Final Thoughts
Conducting API stress tests using Apache JMeter’s HTTP(S) Test Script Recorder and Postman’s proxy configuration is a powerful method to ensure your APIs can handle real-world traffic. This approach allows you to capture and analyze essential performance data while streamlining the test setup process. By identifying and addressing performance issues early in your development cycle, you can build reliable, scalable APIs that meet the demands of your users.
Get In Orbit in your inbox
A monthly selection of articles and perspectives from KWAN. Choose what's relevant to you.
Related Articles

Senior Engineers in Weeks, Not Months
Discover how a well-maintained talent pipeline enables nearshore outsourcing success, reducing hiring timelines from mon...
Read article
The Number That Predicts Whether Your Ne...
Discover why talent continuity rate is the key metric for nearshore outsourcing success and how it impacts project deliv...
Read article
Nearshore vs Outsourcing: What's the Act...
Explore the key differences between nearshore and traditional outsourcing, focusing on integration and speed for effecti...
Read article